Users Management
Users with admin level access in the application have the authority to create and manage user accounts, ensuring efficient user management. As an admin level user, you can perform activities like adding new users, deactivating accounts when needed, resetting passwords for security, and viewing roles and access rights assigned to each user.
After creating users, the next step is to assign specific roles to each user, granting them access to different functionalities in the application. Role assignment is crucial for controlling user permissions, ensuring a secure and organized user experience. Administrators are responsible for assigning roles based on user responsibilities, providing fine-tuned control over application functionalities and data access.
Administrators can also edit roles as needed to accommodate business changes or user responsibilities. This ensures up-to-date access controls that align with the organization's needs. Additionally, administrators have the capability to add new roles to adapt the application to evolving business processes or organizational changes. Managing roles enables administrators to configure access permissions and tailored notifications for specific user responsibilities.
Note:
To access the admin user interface, type "\admin" after the base url. Enter the admin related credentials to access the admin user interface.
Accessing User Management
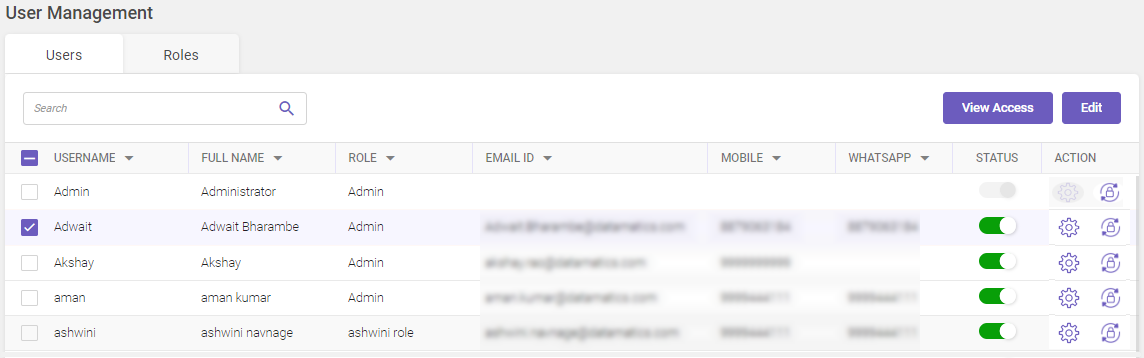
In the main menu, under Application Setup, click User Management. The User Management page opens with 2 tabs Users and Roles.
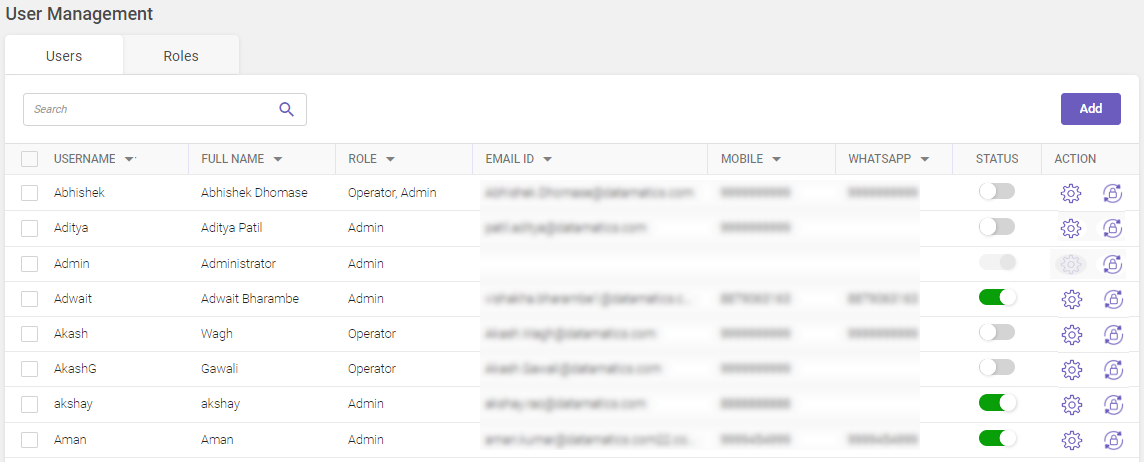
Column header descriptions
|
COLUMN NAME |
DESCRIPTION |
|---|---|
|
Username |
Displays the user name. |
|
Full Name |
Displays the full name of the user. |
|
Role |
Displays the role assigned to the user. |
|
Email ID |
Displays the user's email ID. |
|
Mobile |
Displays the user's mobile number. |
|
|
Displays the user's whatsapp number. |
|
Status |
Displays the active/inactive status of the user. |
|
Action |
Displays the following icons:
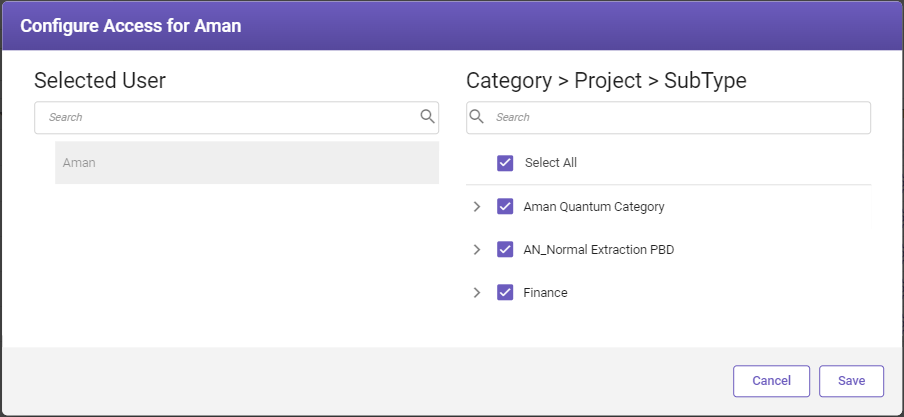
 Configuring Access To configure access to document categories, projects, and subtypes, ensuring users have the necessary permissions, follow these steps:
Upon opening the Configure Access window, the interface is divided into two panes:
Note
|
 icon.
 icon (only visible if an user account is locked).
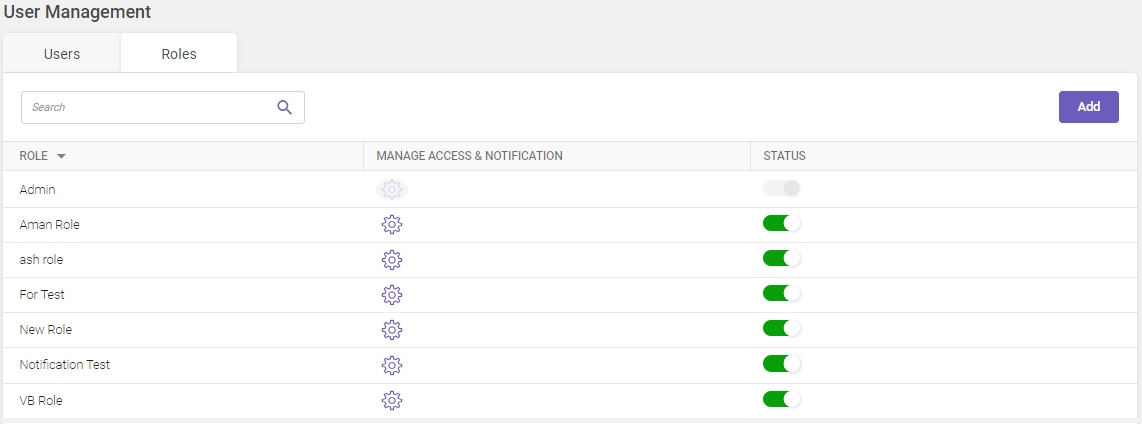
Column header descriptions
|
COLUMN NAME |
DESCRIPTION |
|---|---|
|
Role |
Displays the role name. |
|
Manage Access & Notification |
A user can manage access and notifications as per roles. (Refer How to manage access & notifications.) |
|
Status |
Displays the active/inactive status of the role. |
Managing users
Users with admin level access in the application can perform activities like adding new users, deactivating accounts when needed, resetting passwords for security, and viewing roles and access rights assigned to each user.
Add, Edit, Deactivate & View Access Rights of a User
To add a user, follow these steps:
-
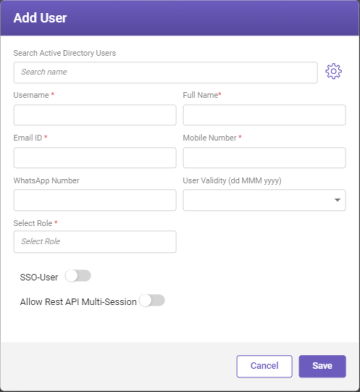
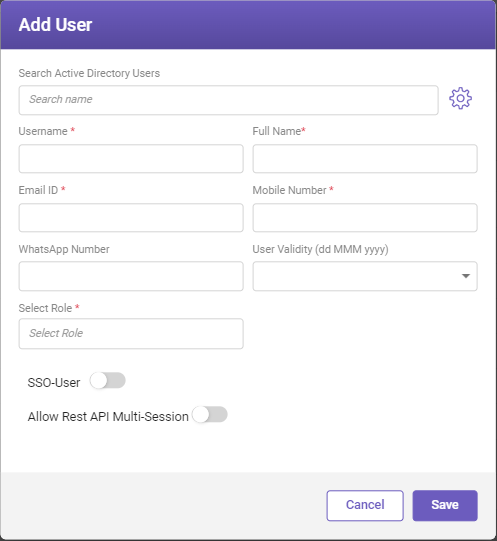
Navigate to the Users tab within the User Management page. In the top-right corner of the page, click the Add button to initiate the user addition process. The Add User window opens.
-
Fill-in the details based on the following field descriptions.
FIELD
DESCRIPTION
Search Active Directory Users
In the field, enter the name of the active directory user you wish to find. Once found, select the required user.
If required, you can configure the Active Directory settings by clicking the
 icon next to the Search Active Directory Users field.Configuring Active Directory
To configure active directory, follow these steps:
-
Click
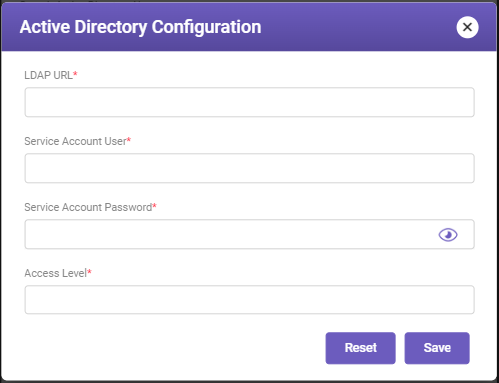
icon, to open the Active Directory Configuration window.
Fill-in the details based on the following field descriptions.
FIELD
DESCRIPTION
LDAP URL*
Enter the LDAP URL to establish a connection to the directory server.
Service Account User*
Enter the service account username.
Service Account Password*
Enter the service account password.
Access Level*
Specify the access level.
* Mandatory fields
-
Click Save to save the details or click Reset to revert any changes.
Username*
Enter the desired username.
Full Name*
Enter the full name of the user.
Email ID*
Enter the user's email address to receive notifications.
Mobile Number*
Enter the user's mobile number.
WhatsApp Number
Enter the user's WhatsApp number.
User Validity (dd MMM yyyy)
From the drop-down select the validity date for the user. After this date, the user will be deactivated. An admin can reactivate if required.
Select Role*
Click within the field to display available roles. Select the checkboxes next to the desired roles that you want to assign or use Select All to assign all the roles.
Start page for this User*
Assign a start page for the user based on selected roles. The user's landing page is defined by the selected role.
Note
This field is displayed when you select multiple roles. For a single-role-user, the landing page is already set as per the role. (Refer How to add a role)
SSO-User
Enable the toggle button to enable Single Sign-On (SSO) authentication. (Refer SSO configuration)
Allow Rest API Multi-session
Enable the toggle button to allow Rest API multi-session for the user, permitting multiple logins with the same credentials.
* Mandatory fields
-
Note:
-
When you select the checkbox, the Add button changes to Edit button.
-
Administrators possess the authority to edit all user details and toggle status, except for their own details and status.
-
A logged-in user is restricted from editing their own details and toggle status.
To edit a user, follow these steps:
-
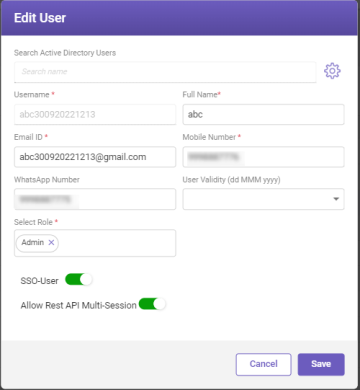
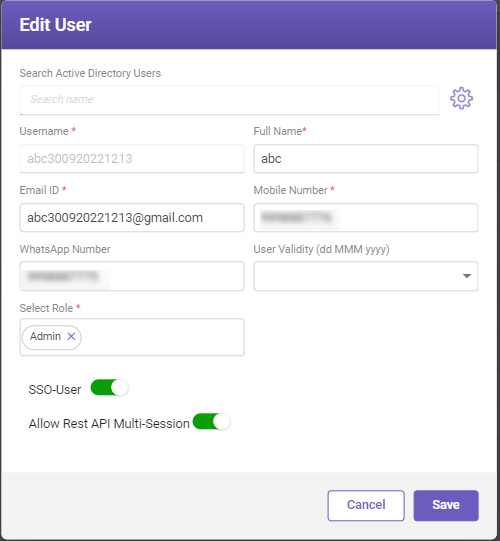
Navigate to the Users tab within the User Management page. Select the user whose details you need to modify and click the Edit button to modify the details. The Edit User window opens.
-
Modify the necessary details according to your requirements and then click Save.
This section provides instructions on how administrators with proper privileges can temporarily deactivate users within the User Management module. Deactivation ensures that the deactivated users cannot make modifications during this period.
Note:
-
Admin: Administrators with the appropriate rights will receive email notifications on the TruCap+ registered mail address when a user account is set to be deactivated in 7 days (every day from the 7th day). For multiple users whose accounts are scheduled to expire simultaneously, a consolidated email will be sent to the registered mail address.
-
User: Users will receive email notifications on the TruCap+ registered mail address, alerting them that their account will be deactivated in 7 days.
-
You have the option to set the time of receiving email notifications in application settings.
To deactivate a single user
To deactivate a single user, follow these steps:
-
Navigate to the User Management page and locate the user you wish to deactivate.
-
In the Status column, turn off the toggle button associated with the user to deactivate the user.
To deactivate multiple users
To deactivate multiple users, follow these steps:
-
Select the users you intend to deactivate from the User Management page.
-
In the top-right corner of the page, you will see the Deactivate button.
-
Click the Deactivate button to initiate the deactivation process for the selected users.
This section provides a comprehensive guide on how to efficiently view the access rights assigned to a user within the User Management module.
To view the user's access rights, follow these steps:
-
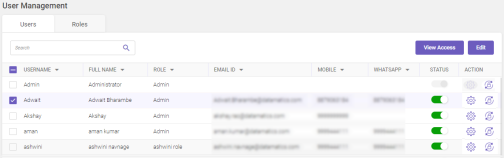
Navigate to the User Management page. Identify and select the user for whom you wish to review the access rights..
-
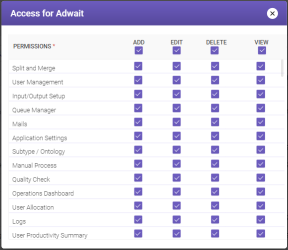
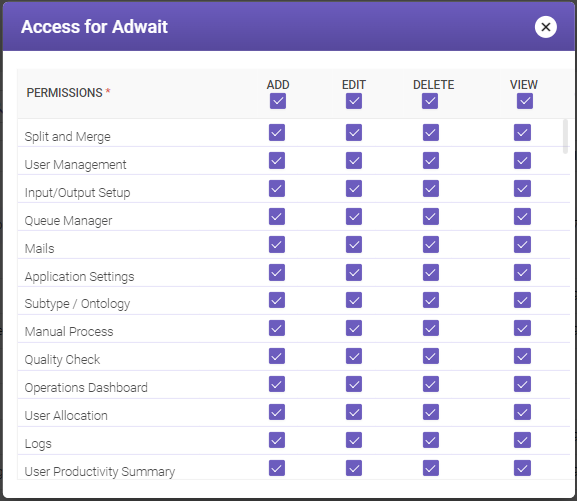
In the top-right corner of the User Management page, click View Access. A pop-up window will appear, showcasing a comprehensive overview of the access rights assigned to the chosen user. The displayed information will provide a clear understanding of the specific permissions and functionalities accessible to the user (see below image).
Managing roles
Role assignment is crucial for controlling user permissions, ensuring a secure and organized user experience. Administrators are responsible for assigning roles based on user responsibilities. Administrators can also edit roles as needed to accommodate business changes or user responsibilities.
Add Roles & Manage Access and Notifications
To add a role, follow these steps:
-
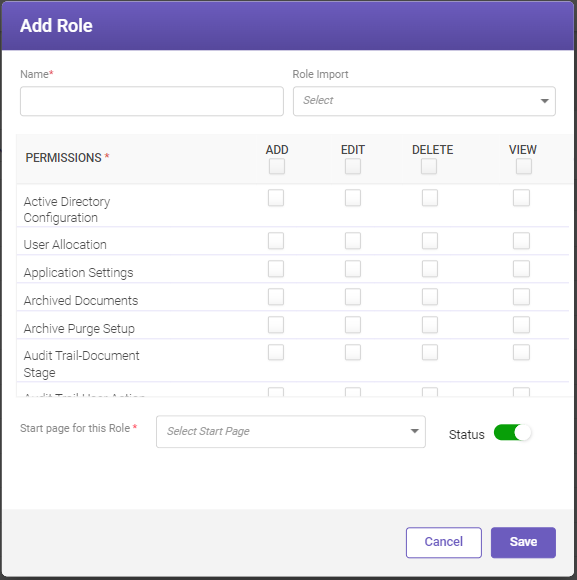
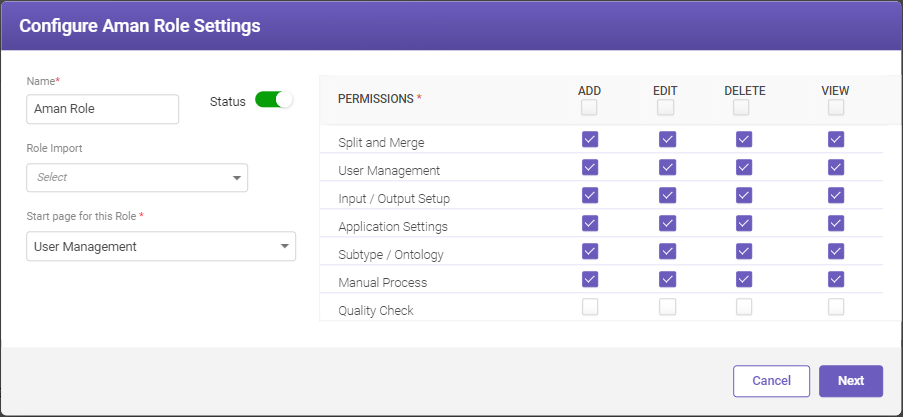
Navigate to the Roles tab within the User Management page. In the top-right corner of the page, click the Add button. The Add Role window opens.
-
Fill-in the details based on the following field descriptions.
FIELD
DESCRIPTION
Name*
Enter the role name to be added.
Role Import
Based on the requirement you can select an existing role from the drop-down to import its permissions. The permissions can be edited if required.
Permissions allow users with specific roles to perform various activities. Four types of permissions are available: Add, Edit, Delete, and View. These permissions are applicable for each module.
Select the checkboxes corresponding to the permissions you wish to grant to the role.
Start page for this Role*
Select the start page that will be displayed for users assigned with the given role.
Status
Enable the toggle button to activate the role.
* Mandatory fields
-
Once you've filled in the necessary details, click Save to confirm the addition of the role.
This section outlines the process of efficiently managing role-based access and notifications within the User Management module. Users can receive alerts through various modes such as Email, SMS, and Whatsapp, enhancing their ability to stay informed about important events. This section explains how to configure role settings, subscription to alert modes, and specific notification preferences.
To manage access and notifications, follow these steps:
-
Navigate to the Roles tab within the User Management page. Under Manage Access & Notification column, click
icon. The Configure Role Settings window specific to the chosen role opens.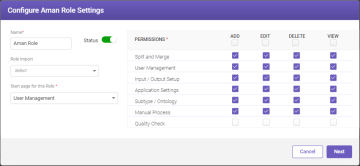
-
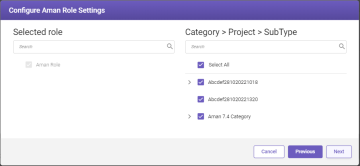
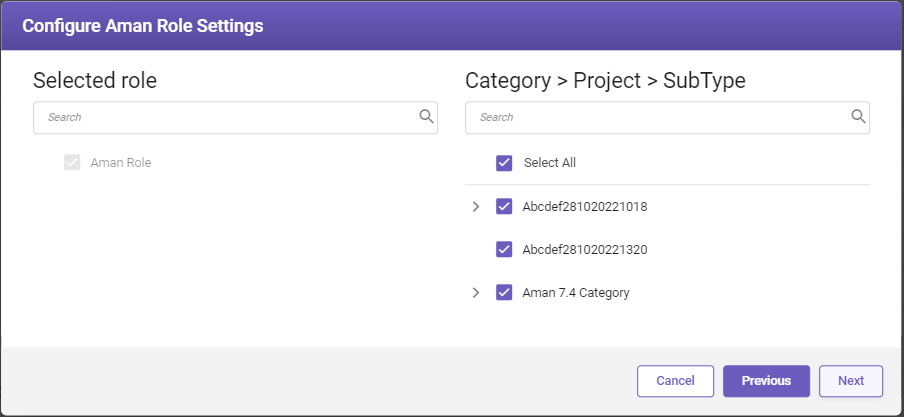
Modify the necessary details as required for the specific role. Click Next to proceed to the next step, where role-based access can be edited further.
-
In the subsequent Configure Role Settings window:
-
Customize access to different alert modes for the role, including Email, SMS, and WhatsApp.
-
Follow these steps to configure notification preferences:
-
Select the desired subcategory checkboxes for which the user should receive notifications.
-
Choose the notification modes (Email, SMS, and WhatsApp) through which the user prefers to receive notifications.
-
Click Previous if you wish to review or modify details entered in the previous step, or click Save to confirm the configuration.
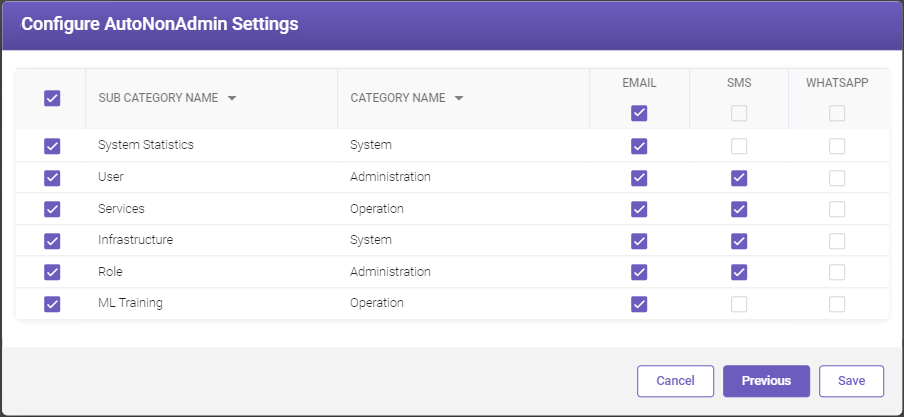
The following window displays the list of notification alerts assigned to a role. All the users assigned with this role would receive the notification alerts. For Example
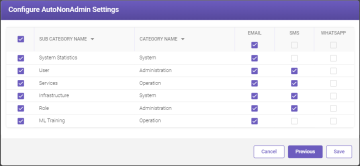
For information about the column headers, refer the table below.
COLUMN NAME
DESCRIPTION
Sub Category Name
Displays the name of the notification subcategory. Select the subcategories for which notifications should be received.
The available sub categories are:
-
System Statistics: It gives information about the system's performance. Notifications such as CPU, RAM, Drive alerts, etc., are received.
-
User: It gives TruCap+ user-specific information. Notifications such as new user creation, password change, failed login, etc., are received.
-
Services: It gives information about TruCap+ services. Notifications such as service start, service stop, folder not found, etc., are received.
-
Infrastructure: It gives information about the system infrastructure. Notifications such as server down, database down, SMTP server not found, etc., is received.
-
Role: It gives information about the roles assigned to a user. Notifications such as new role assigned, removal of role, role rights changed, etc., are received.
-
ML training: It gives information about ML models in TruCap+. Notifications such as successfully trained ML model, ML model trained and pending approval, failed ML model training, etc., are received.
-
Tenant: It gives information about any activity related to a multi-tenant environment. Notifications such as customer configured, a virtual host configured, etc., are received.
-
WebApp: It gives information about an application stored on a remote server. Notifications for any unexpected errors, etc., are received.
Category Name
Displays the name of the notification category, such as, Administration, Operation, and System.
Email
Select the checkbox if you want to receive notifications on TruCap+ registered email id. Refer How to add a user.
SMS
Select the checkbox if you want to receive notifications on TruCap+ registered mobile number. Refer How to add a user.
WhatsApp
Select the checkbox if you want to receive notifications on TruCap+ registered WhatsApp number. Refer How to add a user.
-
-
Select the required subcategory checkboxes for which the user wants to receive notifications and then select the notification modes (Email, SMS, and WhatsApp) to receive notifications. Click Previous if you wish to review or modify details entered in the previous step, or click Save to confirm the configuration.